Thursday 2 August 2018

This week we’re talking science and all things wildlife related at the Eisteddfod from the 4th to the 11th of August.


Going Wild at the Cardiff Eisteddfod!

This year we’re helping with the science activities for the National Eisteddfod in Cardiff Bay and more excitingly taking tour groups 
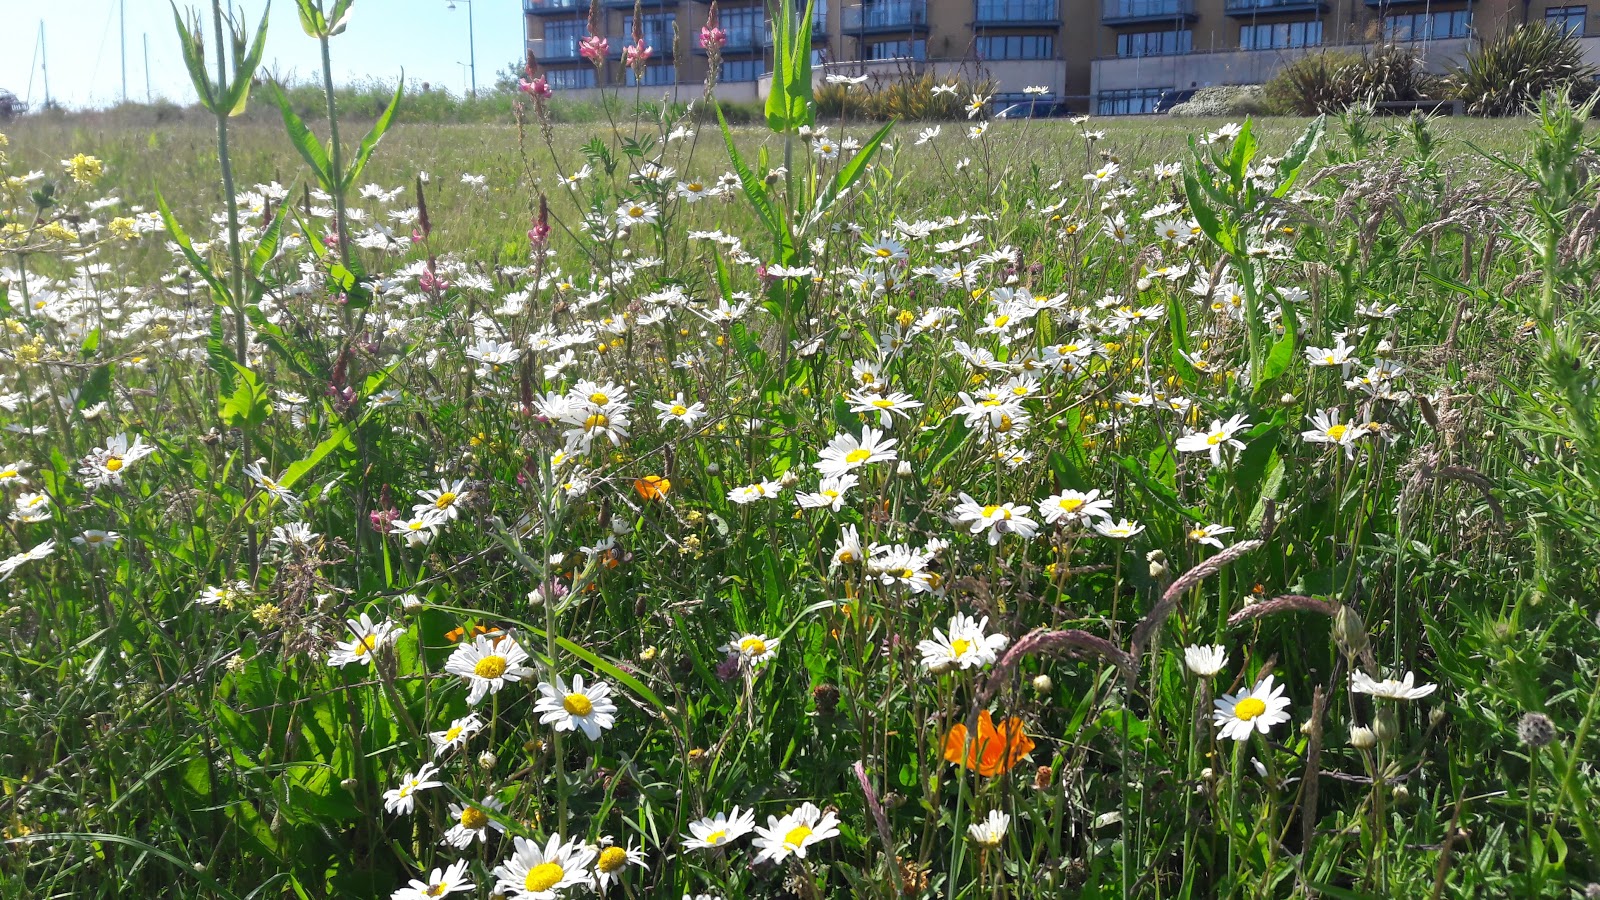
around the Cardiff Bay Wetlands to take in the amazing variety of Wildlife found in our capital! The wetlands are a wonderful place where you can see a wide variety of different bird species such as Grebes, Herons, Sand Martins and more. There are also wildflower areas which attract pollinators such as butterflies and many different bee species. In the ponds you can find frogs, fish and plenty of dragonflies and damselflies darting around. There is even a resident fox who can be seen stealing eggs from nests!

We at Eco-explore Education are scientists with a passion for science communication and Cardiff Bay has an important place in our hearts. Cardiff Bay is important for wildlife and scientists. Many research projects have been conducted in the Bay and because of that work we now know more about how we can protect some of our vulnerable ecosystems from the effects of climate change. It’s also the place where the idea for Eco-explore Education first started and a walk around the wetlands turned into an exciting project designed to make a real difference to young people.


This year the Eisteddfod is a little different, entry is free and unlike other years the location is accessible. These differences are part of what makes this years Eisteddfod so exciting. We work with communities who live in areas of economic deprivation. Having an Eisteddfod which is easily accessible by public transport is fantastic as many of the families we work with don’t have access to cars. The cost of travelling to and attending the Eisteddfod often means that families are dissuaded from participating in this wonderful event which is so integral to Welsh culture. We’re proud to be a part of the first free Eisteddfod and we hope to see more in future.


We wouldn’t be at this years Eisteddfod (in fact we wouldn’t be here at all!) If it wasn’t for funding provided to us by the Big Lottery Fund. We owe you a huge thank you for all your support and encouragement and we look forward to seeing you at the Eisteddfod!

Lots of love,

The Eco-explore Education Team 💚🐝🐦🌻

We’ll be taking tours around the wetlands reserve in the bay every day of the Eisteddfod at 11am and 2pm. You can book a tour at the Red Information Hub, located at the Cardiff Bay Pierhead during the Eisteddfod or by emailing me at eco-exploreeducation@gmail.com

Monday 4 June 2018


Have you ever wondered how bats catch their food in the dark?

If you’re a nocturnal predator, hunting at night it can be hard to see your food!
Bats have a clever way of dealing with this, they use echolocation.


Echolocation is when bats make noises and the listen to the echo as the sounds bounce off of objects. This creates a ‘sound picture’ allowing bats to ‘see’ even on the darkest nights.
Bats are so good at using sound to see their environment that they can scoop up the tiniest insects mid-air!With echolocation bats can even decide which side of a spiders web a spider is sitting on and snatch it off of the web without even stopping!

But how do they do it? This week we’ll be talking about how echolocation works and finding out if you’ve got what it takes to be a bat!

Echolocation is when animals make loud sounds and listen for the echo of those sounds as they bounce off of objects around them. Bats can do it and so can some sea mammals just like Bailey in Finding Dory!


When bats echolocate, they use sounds which are very high pitched. This means that the sounds are very high, so high that humans can’t even hear them!

Challenge #1 Could you be a bat? -  Make the highest sound you can!
Challenge a friend or family member and see who can make the highest sound!

SCIENCE BIT!


High pitched sounds travel shorter distances than low pitched sounds. The higher the sounds the shorter the distance it can travel. The lower the pitch of the sound the further it can travel. That means that low pitched sounds can be heard really far away but high-pitched sounds can’t.
So how do bats make their sounds travel long distances even though they are high pitched? Imagine your friend is stood a long way away from you, how do you get their attention?
You shout! And that’s exactly what bats do. They make their sounds louder so that they travel further.

  
Challenge #2 Could you be a bat? -  Make the loudest sound!
Challenge a friend or family member and see who can make the loudest sound!

Challenge a friend or family member and see who can make the loudest AND the highest sound!

That means that when bats are flying around at night they are shouting at the top of their lungs. We just can’t hear them because their voices are too high for us to hear!
We know how bats produce the loud sounds they need for echolocation but how do they turn those sounds into a ‘sound picture’? The first step is to catch the sounds as they bounce back. For this, bats have really big ears. Their big ears maximise the sounds they pick-up, some bats can even change the shape of their ears to help them to hear better! Once they capture the sounds with their large ears the information goes to the bats brain where it is transformed from sounds into a picture of the bats surroundings.


Challenge #3 Could you be a bat? -  Make yourself some bat ears!
Find our making bat ears tutorial on our Padlet page, print it out and have a go!

So now we know how bats make the loud sounds that they need for echolocation and how capture and use those sounds to sense their environment. Check out the next blog post to find out how bats hunt and capture their prey, what bats eat and for our final three Could You Be a Bat? Challenges.


We’re Going Wild in Bryn Bach Park, Saturday the 9th of June! Come and meet a real live bat, take part in our LIVE could you be a bat challenges and ask us any bat-related questions! We’ll see you there!


Thursday 22 March 2018

This week, Spring has finally sprung!

Hello my friends!

It's official: Spring is finally here! and even though we've been seeing Spring flowers and migrating Spring birds for a while now, we've only just entered the Spring equinox. The Spring equinox is when the days start to get longer and warmer because of the angle of the earth's tilt toward the sun. Check out the video bellow for more information!
 There are a lot of amazing things to see in spring, animals come out of hibernation, spring bulbs start popping up, migrating birds return and almost all birds begin to make their nests and lay their eggs.

This week we're giving the birds a helping hand collecting  nest materials! You can find all the things you need for this activity outside, so lets get started!


You will need:
  • Moss 
  • Sticks of different sizes
  • Dried Grass
  • Optional: Pet hair, if you have a particularly hairy pet


Step 1

The first Step is to gather nest materials. You could get these from your back garden or you could go on a walk to collect them. I used moss, sticks, dried grass and dried plants. 


Step 2

Place the materials in a location you can observe - but not too close! or you'll scare away the birds. If you have a bird feeder, placing your nest materials near to the feeder can help birds to spot them.

Step 3

Sit back and relax.
It might take a little while for birds to find the nesting resources and you might not see them take them but you will be able to tell when some goes missing so keep and eye out! Binoculars can be helpful for watching the nesting resources but you don't need them. The most important thing is to keep your distance so that the birds will feel safe.

Bonus!


Some birds are gardeners... sort of. Some birds can recognise different plants and add plants to their nests which smell strongly to help keep their nests bug free. You can try adding herbs to your nest materials like dried lavender or thyme and see if the birds take them!

Birds nest in all sorts of places, like this pair of jackdaws in my garden nesting in an old chimney pot!

If you enjoyed this tutorial, check out the blog for more! Have you got any birds nesting in your garden? Send me pictures on Facebook or Twitter
Have a great week!
-Sarah 💚😃🐦


Wednesday 7 March 2018

This week we're talking about Spring flowers

This Week We're Talking About Spring Flowers

The first thing I think of when I think of spring is all of the beautiful flowers! But don't worry, if beautiful flowers aren't for you there are also some fun experiments to try!
All of these flowers spend all winter deep inside the soil as Bulbs. Bulbs are plant food stores, the plant stores energy in the form of starch inside bulbs to allow it to survive winter when there is not much sunlight to make food. In the spring, bulbs first start to grow roots and then shoots which will eventually grow into a full flower!
These are some of my favorite spring flowers that you can look out for the next time you go for a walk. You'll probably recognise the first flower, they're daffodils. The bright yellow flowers of daffodils are great for attracting insect pollinators. Next, we have crocuses, these grow in large clumps of white and purple flowers close to the ground, my favorite spring flower is the Snake's Head Fritillary. The Snake's Head Fritillary is called this because it's scaly pattern and droopy flowers make it look like the head of a snake!   Finally, bluebells. Bluebells often grow in large groups in woodlands to see them you could even go to a beautiful bluebell wood like the one pictured below, to find a bluebell wood near you click here.
 

Dissecting Daffodils

You can cut open a flower to see all of its internal structures. Daffodils work well but you could also use tulips or lilies. I placed the stem of my flower in some clean water with a little blue food colouring the night before my experiment - wait and see what happened!


You will need:

  • Safety scissors
  • A chopping board or mat
  • A flower
  • A guide to the parts of a flower, you can find a printable one here or a photo guide here

Step 1

First, lay your flower onto the mat with the flower facing to one side. Carefully snip through the flower, try to cut it in half.

Step 2

Next, lay your two halves out on the mat and take a look inside. You could use a magnifying glass for an even closer look! Try to name the structures you see. 

Parts of a flower

The anthers are where pollen is stored, bees rub against these while feeding on nectar from the flower and get covered in pollen! The bee than takes this pollen to the next flower it visits - this is called pollination. The ovules at the bottom of the flower are what will become the daffodil's seeds, to make these into seeds, the dafodil also needs pollen from another plant which is brought to them by the bees!

Bonus!

Because I soaked my flower in blue coloured water the night before if I cut open the stem I can see little blue lines. These are xylem. Xylem carry water all the way from the bottom of the plant to the top - plants need to drink too!

Thank you for reading my blog! As always I would love to see any picture of the experiments you try at home, or any cool nature finds you have! You can send them to me on Facebook or Twitter and while you're there check out our exciting new prize giveaway!
I'll be back next week with more experiment ideas and nature crafts, until then my friends, have a great Spring!

Sarah 💚😀💚


Monday 5 March 2018

This Week we're talking Cuckoo Spit!

This week we're talking about cuckoo spit! 

Have you seen this mysterious, foamy substance in your garden or outside in the springtime? Ever wondered what it is?
You might have heard it called 'Cuckoo Spit' but don't worry! It's not really spit and it doesn't have anything to do with cuckoos.
Cuckoo spit is made by this little guy, he's a froghopper (Sometimes called leafhoppers). Leafhoppers make cuckoo spit to protect themselves from predators and the weather while they transform from nymphs (babies) into adults. Think of how a caterpillar changes into a butterfly, this is similar, it's called Metamorphosis. 
A baby leafhopper, finds himself a nice leaf and then blows these bubbles out of his bum, like this ->
It's pretty impressive. This foamy, bubbly substance will keep the nymph safe an moist until he changes into an adult with a hard outer casing called an exoskeleton. Froghoppers belong to a group called Hemiptera also known as the 'True Bugs', there are many different types of froghoppers and they come in all sorts of beautiful colours and shapes.
Check out the tutorial below and find out how to make your very own cuckoo spit and leafhopper!

Making Cuckoo Spit!

You will need:

  • 1/2 a cup of clear school glue 
  • 1/2 a cup of liquid starch (or add water to powdered starch!)
  • 1/2 a cup of water
  • A measuring cup
  • A bowl and a spoon

Step 1

Use your measuring cup to add 1/2 a cup of glue to 1/2 a cup of water in a bowl. Mix this really well to make sure they are fully combined!

Step 2

Mix in 1/2 a cup of liquid starch, your slime will start to form instantly!  Mix well with a spoon.

Step 3

Switch to mixing with your hands, to make this look more like cuckoo spit we want LOTS OF BUBBLES so try folding the slime to trap lots of air inside. 
This air will escape when you stop playing with your slime, but you can add more bubbles by using the same folding trick. 

Awesome! You've made some beautiful cuckoo spit! Next, let's make a little froghopper to live inside!

You will need:
  • Different colours of playdough
  • A leaf
  • Craft Feathers/ sequins/ glitter/ pipe cleaners - Whatever you like!
  • The Cuckoo spit we just made

Step 1

Use whatever colour playdough you like to make the basic shape of your leafhopper. Start with a round head and then flatten the body, this is really important, leafhoppers have a flat body to make them Aerodynamic this means that their bodies move through the air easily and help them jump really far!

Step 2

Use any decorations you like to make your leafhopper really stand out! Don't forget the big eyes -  Leafhoppers need great eyesight to help them land safely when doing a big jump.I was inspired by some pictures I found online, leafhoppers really do come in so many different colours and shapes! 

Step 3

Place your leafhopper on his leaf and place your homemade cuckoo spit on top. Snug as a bug in a rug slime!

Thank you for giving this experiment a go! Let me know how it went and send me your pictures on Facebook and Twitter!


Until next week my friends! - Sarah 💚😊💚


Tuesday 24 October 2017

Making Magic Potions! - This week we're talking density.

Making Magic Potions! - This week we're talking density

Halloween is almost here! Why not try mixing up some magic potions? 👻💚😀

The science bit

Density is mass per unit volume, that means that to work out how 'dense' a liquid is you divide its weight by the area it takes up for example if a substance weighs 10g and has an area (that's the length x width x depth) of 2cm³ it has a density of 5gcm³.
Ok, that was complicated, but think of it like this, water is less dense than syrup. If you have 2 bags 1 filled with syrup, the other filled with water but both have the same amount of liquid which will be heavier? It's the syrup - there is the same amount in the bag but it weighs more because the syrup is denser.
So, other than filling bags with fluids (fun, but messy) how can we see which liquids are denser? Try this magic potion experiment to find out!

Making magic potions

You will need:
  • Water
  • Oil
  • Treacle
  • Golden Syrup 
  • A clear container, with a lid
  • Optional extras: glitter, food colouring, plastic toys of different weights.

First of all, we need to add our different substances to our container, try to use equal amounts of each liquid to make this a fair test - What do you think will happen?
I like to add food colouring to the water to make this extra magical, you could also add glitter or sequins! 

Now have a look at the different layers that will form in your container, at the very bottom is the densest liquid and at the top the least dense. Make a note of the order the liquids settle in, from least dense to most. (Spoiler alert!: Oil < Water < Syrup < Treacle). 

Now try turning your container upside down - What happens? do the layers stay the same or do they change? You can check this by looking at what you noted down in the last step!
For extra fun and a nice spooky effect, try adding some plastic toys of different weights, do they sink or float? Or do they hover in the middle? What do you think this means? Let me know on Twitter! You can also send your pictures of your experiments to our Facebook 👻

Happy Halloween! 

Sarah 💚

Monday 25 September 2017

Apple Bird Feeders


This week we're talking garden birds and environmental stewardship


This year I've had some amazing garden birds including Green Finches, Starlings, Blue Tits, and Great Tits! This is the first year that I've started feeding the birds in my garden and in such a short space of time I was amazed at how many birds my feeders attracted and how diverse they are. It does take some patience, the birds won't arrive immediately they need some time to learn that there is a food source in your garden that they can exploit, but once they find the food they will come back day after day!


Why Feed Garden Birds?

Bird watching is fun and it can be really exciting to see birds start visiting you garden but more important is the role you're playing to care for your local environment. Birds are an essential part of the food chain for larger birds and other predators and have many other important ecological roles, by feeding them - especially in winter when food is scarce, we can help to protect them and other animals. Lots of space that would have been good habitat for birds with lots of food is now taken up by humans, making it harder for birds to find enough to eat. By putting feeders in our gardens we can help to keep birds healthy!

So here's how to make your very own (super simple!) apple bird feeder!

You will need:

  • An apple
  • Garden Twine
  • Scissors
  • 2 Sticks
  • Sunflower seeds 
First, cut yourself a length of twine about as long as your arm. Maybe longer if you have tiny arms. Then tie the end of the twine to one of the sticks.
Next, make a hole all the way through your apple from top to bottom. I used a screwdriver to do this. Best to let a responsible adult do this. I accidentally poked myself with the screwdriver.

 Next, push the remaining stick all the way through the apple to make two perches.

Finally, completely cover your apple with sunflower seeds by pushing them into the apple. This can take a long time to completely cover the apple but the more seeds you get in there the more food there will be for hungry birds!

You're done! Hang your feeder up a high as you can in a tree or in another high place so that birds can reach it easily.

Check back nest week (haha) for another science experiment or nature tutorial and more terrible puns!

Have a great summer!

Sarah


Come and say hi on Facebook and Twitter 😄😄😄